Hair glitter seems to be everywhere right now. I mean did it ever go away? I remember slathering myself in glitter gel as a teenager in the 90’s. Little did I know how easy it is to make this stuff!

I was recently on a mission to outfit my daughter and her BFF for our trip to Disneyland. I didn’t want to shell out the $$ for a Bibbidi Bobbedi Boutique make-over. I had seen this chunky hair glitter gel at a couple craft fairs and in various retail stores and I knew it would be perfect for Disneyland.
The gels I have seen out and about are selling for upwards of $10.00 or more for smaller containers! I knew I could make it for way cheaper and customized to my daughter’s obsession with Disney Princesses.
I let my daughter and another friend test out the glitter gel at a local school picnic and we couldn’t get 5 feet without someone asking us where we got the hair glitter. I should have set up a booth!
This is honestly the easiest DIY ever!
Supplies:

- Cute containers – I used these ones from Hobby Lobby, Target and Ikea. You can also buy the mini-Mason jars in a 24 pack on Amazon – perfect for party favors!
- Clear Hair Gel – I got this tub at Target. You get a ton of gel for only $3! I still have a bunch left over.
- Glitter – lots and lots of glitter. I had a lot of glitter on hand in my craft stash, but I purchased a couple more colors at Hobby Lobby and Michaels.
- A bowl and spoon for mixing.
- Ziplock bag to “pipe” the gel into your cute container.
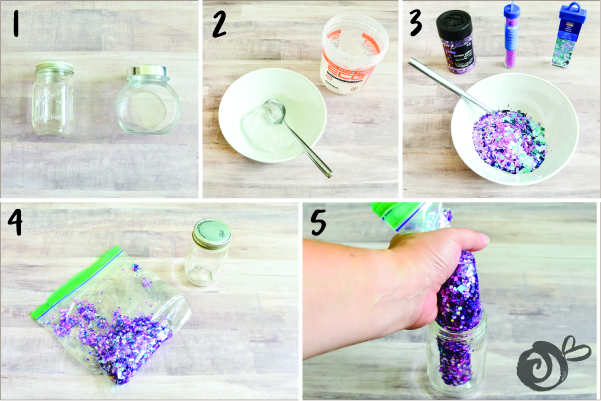
Step 1:
Round up your containers of choice. I used plastic Artist Jars from the Hobby Lobby for my first batch as we were traveling to California and I didn’t want to take glass on the airplane. They worked great and have kept the gel nice and moist (eeewwww… I said moist. Yuck.).
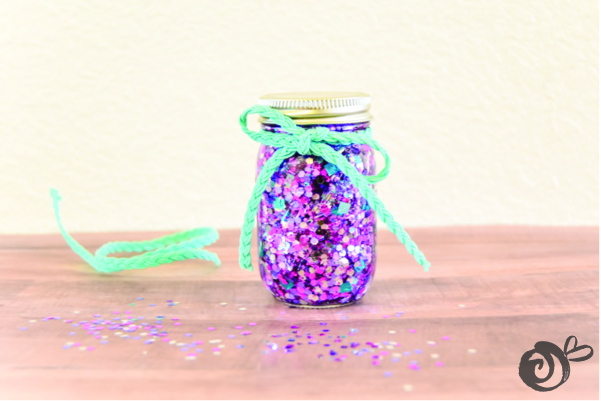
I decided to whip up another batch for a friend’s birthday. I went with these adorable mini-Mason Jars. I also have several of these little glass jars from Ikea which would work great as well.
Step 2:
Grab a bowl and a spoon. I’m going to be really precise with my measurements here…put a “glob” of gel into the bowl. Precise enough for you? The first time I made the glitter gel I mixed it directly in the container. Do whatever works for your container. If the container has a narrow opening, like the mini-Mason jar, I recommend you mix the glitter gel in a bowl first.
Step 3:
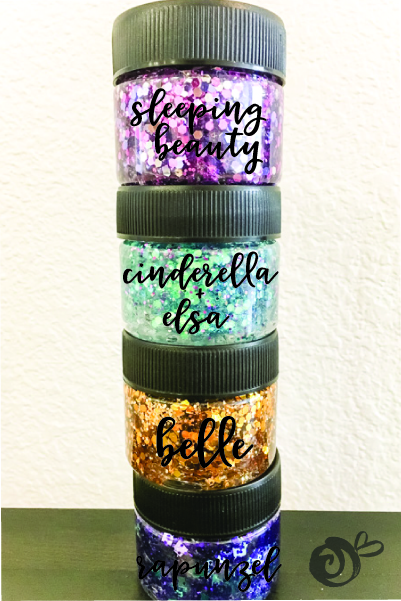
This is the fun part. Pour a “bunch” (also a precise measurement) of glitter into the gel. You can always add a little more gel if you think there is too much glitter. I found that the chunkier glitter shows up in the hair the best. I also add some smaller glitter (NOT the super fine kind) to add more color. Here are the combinations I used:
For Belle I used this chunky gold glitter from Hobby Lobby and this finer gold glitter from Michaels. This glitter looks awesome too!
For Rapunzel I went with a mix of purple glitter and square confetti glitter in the color “Lakefront” to mimic the floating lanterns. I also like this pink glitter.
Sleeping Beauty needs pink glitter of course! I used this chunky glitter and this finer version.
For Elsa and Cinderella I used a mix of chunky light blue glitter in Tourmaline and a fine silver blue glitter.
I also came across this “festival glitter” that looks awesome. It is chunky, has cool shapes and comes in a lot of colors! I’m also a sucker for names like: Silver Holographic, Unicorn, Mermaid, Gold Rockstar,Fairy Dust, Rose Gold, Icon, Superstar and Mermaid Lagoon. I think I’m going to grab some for my next batch of glitter gel! Because this glitter comes in a smaller container, I recommend only mixing a bit with gel when you are planning to use it rather than making it in a bulk batch.
Step 4:
Spoon the glitter gel into a sealable sandwich bag and cut off one corner.
Step 5:
“Pipe” (a.k.a. squeeze) the glitter gel into your container.
Application:
Simply apply to the hair with your fingers or with a hair dye applicator brush.
The Final Result!

These make awesome party favors or gifts too! Just tie a cute ribbon around the top.

Aren’t these mini-Mason jars the cutest thing you have ever seen?!
Wash out!
The Goose has super curly hair that gets easily matted (a problem I have only recently resolved – more on that later). Even with her crazy hair, this gel washed out easily. I use a detachable shower head and simply rinsed from the top of her head while shaking my hands through her curls. This is why I do not recommend extra fine glitter. The chunky glitter is so much easier to see in the hair and way easier to wash out!

If you liked this tutorial, please share on Pinterest!


This post does not contain affiliate links at this time. All products I recommend are truly items or services I personally use and love, regardless of affiliate status.

